
My RB-67 Got Haze.
Earlier this year I pulled my old RB-67 out to admire it and noticed that the 127mm lens had developed a nasty case of the haze. While doing some internet research, I found that there is a guy on Youtube who makes disassembling Mamiya lenses look easy. After collecting a few needed tools, I took the lens apart to find that the haze was between elements that were glued together and mounted in a metal collar. In fact, there were two such lens pairs in the lens, one in front of the shutter and one behind. Both were fogged.
My first solution was to buy a used lens on ebay, upgrading from my Mamiya-Sekor C lens to the better K/L version. The one I bought was specifically described with words like “Near Mint” and “no haze”. Unfortunately, it did have haze, so I returned it, very much discouraged from trying to find a replacement on ebay.
My next solution was to send the lens to a repair center that told me they could separate cemented elements and re-glue them. But, when I sent them the lens, they told me they couldn’t do it because of the way the elements were sealed in the metal collar.
Enter the Wizard.
So, I turned to the Photrio forums where a poster named Charles Monday, (aka shutterfinger) suggested that heating the cemented elements in an oven would very likely clear the haze by softening the Canada balsam cement between the elements. I was skeptical, but eventually I decided to give it a shot.
It worked.
I don’t mean it worked a little bit. I mean, I had to struggle to find any remnants of haze. I decided to create a short blog post to tell the story because, in a search of ebay listings for about twenty 127mm Mamiya lenses, all but two of them were described as having some haze. I’m sure this condition affects other lens brands and I’m sure this remedy will be equally applicable to other old lenses, but I only have experience with my one RB-67 lens and I wanted to do my part to spread the word to other RB/RZ-67 owners that this really works to substantially reduce haze between cemented elements. But, please see the disclaimer at the end of this article.
The procedure.
The recommended procedure consists of heating the glued pair of elements in an ordinary kitchen oven at 325F (163C) for 30 minutes, letting it cool down slowly on its own, and then repeating the procedure twice more. Then wait for a few days to see if the lens clears. It it doesn’t, you should repeat the process again.
My Experience.
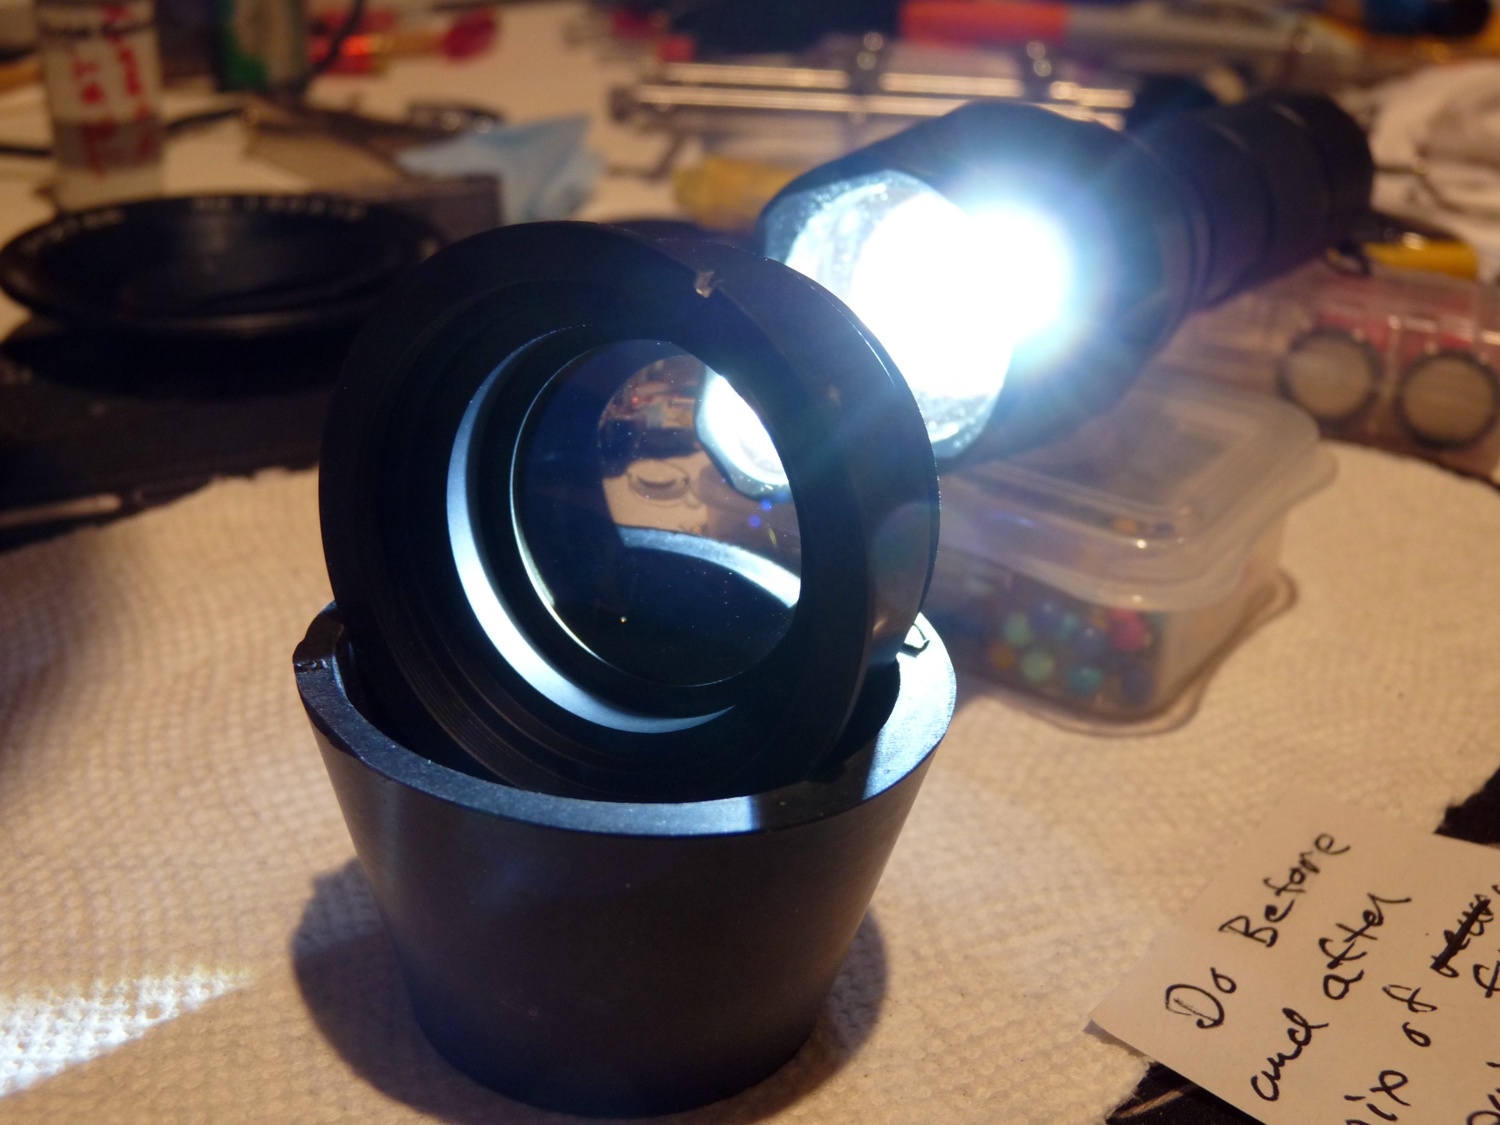
So, I basically followed the procedure exactly. I used a thermocouple at the lens position in the oven to monitor the temperature just out of curiosity. I preheated the oven to 325F (183C), placed the lens pair, complete with the metal collar, in a small shallow metal cookie pan and placed the pan in the middle of the oven’s center rack. The thermocouple indicated an initial temp after preheat of 377F, but after that it varied between 309F (154C) and 352F (178C). Half an hour later, I turned off the heat and let it cool for several hours. After two heat cycles, the lens was still cloudy, but after the third cycle, the lens had cleared. The milky haze was gone.
The next day I repeated the procedure with the front pair of cemented elements and the milky haze disappeared after the first cycle. Why it cleared quicker, I don’t know. Maybe it had less fog or maybe the oven was a little hotter for some reason. In any case, for this pair I was astute enough to take before and after pictures (scroll down).
The Results.
The bottom line is that this simple process has the ability to substantially reduce haze without doing any perceptible damage to the coating or the mechanical mounting. Is it a miracle cure? No, although at first I thought I thought it was. The haze was originally pretty bad on my lens and there remains, on the rear pair of elements, a slight bluish cast to the lens if you shine an LED flashlight through it. That residual haze is enough to lower the contrast of the resulting negatives. The front elements cleared almost completely. It seems likely that the less severe the haze, the less residual haze there will be after the treatment.
This may not be the end of the story. The residual haze may continue to clear after the heat treatment. I plan to let it sit for some weeks or months and then reevaluate whether to subject it to a longer heat cycle or retreat it at a higher temp.
Pictures!

Rear Cemented Element Pair Module

Front Cemented Element Pair Module

Front Pair BEFORE Treatment
Front Pair AFTER Treatment

Front Pair BEFORE Treatment

Front Pair AFTER Treatment
The Inevitable Disclaimer
Don’t do this to a lens you can’t afford to destroy. I exhausted other avenues of repair before doing this, so I considered this an option of last resort. Having now done it, I think the risk is pretty low, but not zero. Just because a few people made it across the mine field doesn’t mean you will. Be careful not to subject the lens to sharp temperature changes by placing it directly on a hot surface.
Note that other forms of lens cement will probably not respond well to this technique, but decades old lenses that use Canada balsam are fair game.
References.
See the entire Photrio thread here.